Easy Layered Taco Dip Recipe
Few appetizers earn their place at every gathering the way a layered taco dip does. It walks into a party already dressed for success — bold colors, bold flavor, and zero fuss between the fridge and the table. This is the dish you make when you need something impressive without spending your afternoon in the kitchen.
What makes this recipe stand out is its architecture. Each layer plays a distinct role: creamy, savory, fresh, sharp. Stacked together, they create contrast in every single bite, which is exactly why this dip disappears faster than almost anything else on a snack table.
I’ve made this for game days, potlucks, and lazy Sunday hangouts, and it never fails to draw a crowd around the bowl within minutes. It’s forgiving, customizable, and genuinely hard to mess up once you understand the basic structure.
This article breaks down everything — ingredients, technique, common pitfalls, and smart storage tips — so your version turns out restaurant-quality on the very first try.
Ingredients You’ll Need
Great layered dips aren’t about fancy techniques; they’re about choosing components that actually complement each other instead of competing for attention. Here’s what builds that perfect bite.
Base Ingredients
- 16 oz refried beans
- 1 cup sour cream
- 1 cup guacamole (store-bought or homemade)
- 1 packet taco seasoning
- 1 ½ cups shredded cheddar cheese
- 1 cup shredded Monterey Jack cheese
- 1 cup diced tomatoes
- ½ cup sliced black olives
- ¼ cup chopped green onions
- 1 cup shredded lettuce
Optional Add-ins
- ½ cup pickled jalapeños
- ½ cup cooked seasoned ground beef
- ¼ cup chopped fresh cilantro
- 2 tbsp lime juice
- ½ cup pico de gallo
- ¼ cup crumbled cotija cheese
Step-by-Step Instructions
Step 1: Prepare the Bean Layer
Warm the refried beans slightly so they spread easily, then mix in the taco seasoning until fully combined. Spread this mixture evenly across the bottom of a wide, shallow serving dish using a spatula. This layer acts as the foundation, so press it down gently to create a flat, even base. A smooth bottom layer keeps the entire dip stable once you start stacking, preventing the toppings from sliding or mixing into each other later.
Step 2: Add the Creamy Layer
In a separate bowl, stir the sour cream until smooth and slightly loosened. Spread it carefully over the bean layer, working from the center outward to avoid disturbing the base underneath. This layer should be thin but complete, covering every corner of the dish. Its job is to add cooling richness that balances the seasoned beans below and the bold guacamole layer coming next.
Step 3: Layer the Guacamole
Spoon the guacamole over the sour cream layer and spread gently using the back of a spoon. Avoid pressing too hard, since this layer is softer and can blend into the one beneath it if handled roughly. For the best texture, use guacamole that’s slightly chunky rather than completely smooth, as it holds its shape better once chilled and sliced into servings.
Step 4: Build the Cheese and Topping Layers
Sprinkle both shredded cheeses evenly over the guacamole, covering the surface completely. Follow with diced tomatoes, black olives, and green onions, distributing them so every scoop gets a bit of everything. If using ground beef or jalapeños, layer them just beneath the cheese for better flavor distribution. Finish with shredded lettuce on top for a fresh, crisp finish.
Step 5: Chill and Serve
Cover the dish tightly with plastic wrap and refrigerate for at least 30 minutes before serving. This resting period allows the layers to set, making clean scoops possible without everything collapsing together. Serve cold alongside tortilla chips, and keep the dip refrigerated until just before guests arrive for the freshest texture and flavor.
Cook Time
Total:
45 minutes
Prep:
45 minutes
Bake:
0 minutes (no-bake recipe)
Servings
This recipe makes approximately 10 to 12 appetizer servings, making it ideal for medium to large gatherings. A standard 9×13-inch dish provides enough surface area for all the layers to spread evenly without feeling skimpy on any single component.
If you’re serving a smaller group, the recipe halves easily without compromising the layer structure. For larger parties, doubling the recipe and using two separate dishes works better than one oversized bowl, since it keeps layers cleaner and easier to scoop.
Portion sizes typically run around ¼ to ⅓ cup per guest when paired with chips, though taco dip has a habit of disappearing faster than people expect once it hits the table.
Common Mistakes in This Recipe
The most frequent issue is spreading layers while ingredients are too warm, which causes them to slide into one another instead of staying distinct. Warm sour cream or freshly made guacamole that hasn’t cooled can soften the entire structure within minutes.
Another common mistake is skipping the chilling step entirely. Rushing straight to serving means the dip never sets, resulting in a messy, soupy presentation rather than clean, defined layers that hold their shape when scooped.
Many home cooks also overload the bean layer with seasoning, making the bottom overpoweringly salty compared to the milder layers above it. Balance matters more than intensity when building a dish meant to be eaten in combined bites.
Lastly, using watery tomatoes or unstrained pico de gallo introduces excess moisture, which seeps downward and turns the cheese and guacamole layers soggy well before the dip is even served.
Solutions to Common Mistakes
Always let warm components like beans cool to room temperature before layering, and use chilled sour cream and guacamole straight from the refrigerator. This single adjustment prevents most structural collapse issues.
Build the dip at least 30 to 45 minutes before serving and refrigerate it uncovered briefly to let the top layer firm up slightly before wrapping. This small habit makes scooping noticeably cleaner.
When seasoning the bean layer, add taco seasoning gradually and taste as you go, since pre-seasoned canned beans may already carry sodium. Under-seasoning slightly is safer than over-seasoning here.
For tomatoes, dice them and let them drain on a paper towel for a few minutes before adding. This simple step removes excess liquid and keeps every layer intact for hours.
Nutritional Information (approx. per serving)
- Calories: 210 kcal
- Protein: 7g
- Carbohydrates: 12g
- Fat: 15g
- Fiber: 3g
- Sodium: 420mg
Beyond being a crowd-pleaser, this dip offers genuine nutritional value thanks to its bean base, which contributes plant-based protein and fiber that support digestion and sustained energy throughout an event.
The guacamole layer brings heart-healthy monounsaturated fats from avocado, along with potassium that helps balance sodium levels from the seasoned layers beneath it.
Fresh toppings like lettuce, tomatoes, and green onions add vitamins A and C along with antioxidants, lightening up what might otherwise feel like an overly rich appetizer.
Using reduced-fat sour cream or swapping in Greek yogurt can lower the fat content further while keeping the same creamy texture guests expect from this layer.
Storage Instructions
Store leftover taco dip tightly covered in the refrigerator for up to three days. Because the dish contains fresh produce and dairy, it’s best enjoyed within this window for optimal texture and flavor.
Avoid freezing this dip, as the sour cream and guacamole layers break down significantly once thawed, resulting in a watery, separated texture that no longer holds its original layered appearance.
If preparing ahead for an event, assemble the bean, sour cream, and guacamole layers up to a day in advance, then add cheese and fresh toppings just before serving for the best presentation.
Always use a clean spoon when serving from stored leftovers to prevent introducing bacteria that can shorten the dip’s shelf life and compromise food safety over multiple servings.
Suggestions
Pair this dip with sturdy tortilla chips that can handle the weight of multiple layers without breaking apart mid-scoop, since thinner chips tend to snap under pressure.
For a lighter version, swap the sour cream layer for plain Greek yogurt and use reduced-fat cheese, which trims calories while still delivering that same creamy, tangy bite guests expect.
Consider serving this alongside a simple green salad or grilled proteins if you’re turning it into part of a larger spread rather than a standalone snack table item.
For added crunch, top the finished dip with crushed tortilla strips just before serving, giving guests texture contrast that pairs beautifully with the smooth layers underneath.
Seasonal Relevance
This dip shines brightest during football season, when game-day spreads call for shareable, no-fuss appetizers that can sit out comfortably while guests come and go throughout the event.
Summer gatherings also benefit from this recipe, since it requires no oven time and uses fresh, in-season produce like tomatoes and green onions at their peak flavor and affordability.
During colder months, this dip works well as a warming contrast on a buffet table filled with heavier, baked dishes, offering guests something cool and refreshing between bites.
Holiday parties and New Year’s gatherings frequently feature this style of dip as well, since it scales easily for larger crowds without demanding extra oven or stovetop space.
Final Words
This layered taco dip earns its popularity honestly — it’s quick, visually striking, and reliably delicious without requiring advanced cooking skills or expensive ingredients to pull off well.
Once you understand the layering logic behind it, you can confidently customize the recipe with whatever proteins, spice levels, or toppings suit your particular crowd or occasion.
It’s the kind of dish that rewards a little patience during assembly and chilling, paying off generously the moment guests start scooping into that first clean, colorful layer.
Keep this recipe in your regular rotation for parties, and don’t be surprised when people start specifically requesting it well before the next gathering rolls around.
Frequently Asked Questions
Can I make this taco dip ahead of time for a party the next day?
Yes, assemble the bean, sour cream, and guacamole layers a day ahead and refrigerate covered. Add cheese, lettuce, and other fresh toppings just before serving to keep everything looking and tasting its best.
What can I use instead of refried beans for the base layer?
Black beans mashed with a bit of olive oil and cumin work well, as does seasoned cream cheese for a richer, tangier base if you prefer something different from traditional refried beans.
Is this recipe gluten-free as written?
Yes, all listed ingredients are naturally gluten-free, though it’s worth double-checking your taco seasoning packet and any store-bought guacamole or sour cream for hidden additives or cross-contamination warnings on the label.
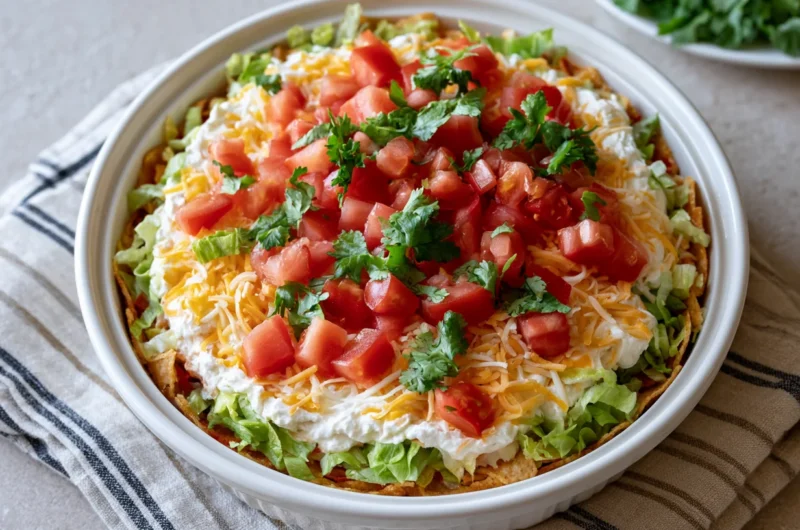
Easy Layered Taco Dip Recipe
10
servings45
minutes210
kcal45
minutesA bold, creamy, no-bake taco dip layered with seasoned beans, sour cream, guacamole, cheese, and fresh toppings. Perfect for parties, game days, and easy entertaining with minimal prep.
Ingredients
Base Ingredients:
16 oz refried beans
1 cup sour cream
1 cup guacamole (store-bought or homemade)
1 packet taco seasoning
1 ½ cups shredded cheddar cheese
1 cup shredded Monterey Jack cheese
1 cup diced tomatoes
½ cup sliced black olives
¼ cup chopped green onions
1 cup shredded lettuce
Optional Add-ins:
½ cup pickled jalapeños
½ cup cooked seasoned ground beef
¼ cup chopped fresh cilantro
2 tbsp lime juice
½ cup pico de gallo
¼ cup crumbled cotija cheese
Directions
- Warm refried beans slightly and mix in taco seasoning until combined.
- Spread the seasoned beans evenly across the bottom of a shallow dish.
- Stir sour cream until smooth and spread it gently over the bean layer.
- Spoon guacamole over the sour cream layer and spread carefully.
- Sprinkle shredded cheddar and Monterey Jack cheese evenly over the guacamole.
- Add diced tomatoes, black olives, and green onions in an even layer.
- Layer in optional add-ins like jalapeños or ground beef beneath the cheese, if using.
- Top with shredded lettuce for a fresh finish.
- Cover tightly and refrigerate for at least 30 minutes before serving.
- Serve cold with sturdy tortilla chips.
Recipe Video
Notes
- Use chilled sour cream and guacamole to prevent layers from sliding.
- Drain diced tomatoes on a paper towel to avoid a soggy dip.
- Assemble bean, sour cream, and guacamole layers a day ahead; add cheese and fresh toppings just before serving.
- Avoid freezing, as dairy and guacamole layers separate and turn watery once thawed.